


There is no doubt that the barbell is the greatest training tool in existence. I’m not discrediting other forms of training, but kettlebells, dumbbells, and even body weight training do not have the versatility of the barbell. One of the barbell’s greatest advantages is its ability to quickly and easily change load. The concept of progressive overload is one of the key components to success in training, no matter the goal, and one of the most effective ways to progressively overload the organism (athlete) is by increasing the load used in training. Take for example, the kettlebell deadlift, a great exercise, and a staple in our gym for teaching people to properly hip-hinge. The biggest kettlebell in our gym is 32kg, a load that is very challenging for most kettlebell specific movements (swings, snatches, get-ups, etc…), but definitely well below sufficient for most people in the hip-hinging deadlift (stiff legged, Romanian, etc…). A quick google search shows that a 36kg kettlebell costs about $175 before shipping, and in reality is only practical for a few exercises at that weight. And then of course once the 36kg becomes to easy you have to buy another kettlebell at the cost of…you get the point.
Despite the barbell being the king of training tools, it is often disregarded in programs from average gym goers to “elite” coaches who think the barbell will make you slow or stiff. For the record a training implement cannot do that to you, only the way you choose to use it can. In this article, we’re going to discuss how to get the most out of the barbell, when it is appropriate to use it, and when it’s not. Hopefully by the end you’ll have a new appreciation, and understanding of this amazing training tool.
The Barbell: A Brief History
Originally barbells had hollowed balls on the end of them that would be filled with lead shot, dirt, or other material to add weight to them. Often participants in strength training competitions didn’t know exactly how much weight they were lifting, only that they were lifting more than previously, or more than their opponents, after more filler had been added on each end. It wasn’t until the 1920s and 30s that “plate loaded” barbells became accessible to the public. This had a profound effect on sports like Weightlifting, which was in the original modern Olympic games in 1896. Weightlifting originally included one handed and two handed lifts. When plate loaded barbells began to be manufactured more regularly, the one-handed lifts were eliminated from Weightlifting competition. Barbells have remained mostly unchanged since, seeing improvements mostly in the quality and strength of the steel they are made with, as well as the ball-bearings being placed in them for better spin (more on that later).
There are many different types of bars, from ez-curl bars, to “buffalo” bars and “safety” bars, but traditionally there are two types of barbells which are called “Olympic Barbells.” A true men’s Olympic barbell measures 2.2 meters in length, 20kg(44lbs) in weight, and has a diameter of 28mm on the shaft. A women’s Olympic barbell is 2.01 meters in length, 15kg(33lbs) in weight, and has a diameter of 25mm on the shaft, as women typically have smaller hands. Although these are the standards used in Weightlifting competitions, there are many iterations that are similar to these specifications, but not quite exact. All of the equipment in our facility is to a competition standard, because we want our training to be of competition quality, even if not all of our clients compete. This also means all of barbells and discs are measured in kilograms. As a coach this makes life a lot easier, because competition discs are color coded, providing a quick and easy way to see how much a client is lifting with just a glance. There are two types of weights that go onto the barbell: A disc (17.5″ in diameter) and “change plates” which are smaller weights that are 10% of their bigger color twin.
- White=5kg/.5kg
- Green=10kg/1kg
- Yellow=15kg/1.5kg
- Blue=20kg/2kg
- Red=25kg/2.5kg
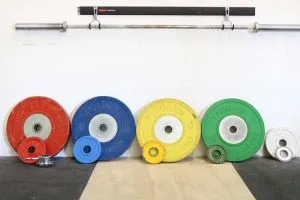
Barbells are also color coded. That means a men’s barbell is marked with blue on its end, and a women’s barbell is marked with yellow. While most people comment that kilos confuse them when they first start training with us, once you learn the 5 colors, it actually becomes a much easier and better system than what you’ll find in most traditional gyms. If you’re curious what the load is in pounds, the conversion is simple: Take the number in kilos, and multiply it by 2.2. If you don’t have a calculator handy, multiply by two, and then add 10%.
70kg= 70×2=140. 140x.10= 14. 14+140=154.
Basic Barbell Training
Although barbells can be used for a variety of different training, traditional barbell work is bilateral, meaning both limbs (arms/legs) are working together against a single implement (the barbell). Here is a list of traditional barbell exercises:
- Squat
- Bench Press
- Deadlift
- Military Press (aka overhead press or strict press)
- Bent Over Row
- Snatch
- Clean (& Jerk)
There are many variations of each of the above exercises, as well as many single joint exercises (like curls) that can be done with barbells, but the above list are the basics of barbell training, and are the movements in which you can move the most loads. In strength training there is what is known as a “one rep max” often abbreviated as 1RM. This refers to the most weight you can lift for a single rep. Although you can test your 1RM on exercises that don’t use barbells, like weighted pull-ups, kettlebell Turkish get-ups (though I wouldn’t recommend it), dumbbell snatches, etc… it’s most common for a 1RM to be tested on one of the exercises listed above. Knowing these numbers gives both the client and coach a much better idea of what an individual is capable of, and allows us to prescribe work at different percentages of that 1RM, rather than prescribing a specific weight in kilos or pounds. For example, if your max squat is 80kg(176lbs) and mine is 200kg(440lbs), we can both perform a workout prescribed as 3 sets of 10 at 70%, as there are specific rep ranges that are appropriate for different percentages of a 1RM. To do 10 reps at 70% is challenging, but very doable for most athletes. To do 10 reps at 90% will be unrealistic for most athletes, save for individuals with a specific muscle fiber type, as well as a very strong mental fortitude. One rep maxes should be retested regularly (every 4-12 weeks), to determine if an athlete’s strength is improving and if a program is eliciting the desired effect. Keep in mind however, if you are an athlete who trains in a team sport (in other words, a sport that doesn’t use a barbell in competition) try not to get too hung up on 1RM numbers. You can become a better athlete without increasing your 1RM. You can read more about that here.
Warming Up
There are two types of warm-ups: General and specific. A general warm-up is what you do at the beginning of each workout. This is a time to slowly elevate your heart rate, increase blood flow, release tight muscles via foam rolling or stretching, and mobilize joints through dynamic unweighted/lightly weighted movement. While you may not need a specific warm-up for something like a box jump or kettlebell swing, any barbell work that is prescribed with a percentage must include an exercise specific warm-up. We ALWAYS start with an empty barbell. These are free reps, meaning they allow you to continue to master the movement, “grease” your nervous system for the action to come, but they have almost no tax on your muscles or body because the weight is so light. Even the best athletes in the world on the biggest competition stage warm-up with an empty barbell. Typically you want a minimum of 3 warm-up sets (not including the bar) prior to getting to your “working” weight. For example if I’m doing 3×10 @ 70%(of 200kg), I may do something like this:
- 20kgx10
- 70kgx8
- 90kgx6
- 110kgx5
- 130kgx3
- 140kg(3×10)
There is no specific rule to follow when it comes to warming up in terms of what % of jumps to take, just be smart about it. Your first weighted set after the empty bar should be any where between 35-45% of your 1RM, and then make 5-20% increases from there depending on how high you’re going, and how many reps you’re doing. As you can see with the example above, you start with lighter weight and more reps, and as the weight gradually increases, the reps gradually decrease, until you reach your working weight. If you aren’t sure about how to warm-up and your coach isn’t available, just stick to these simple guidelines: Don’t make too big of increases from set to set, and don’t do too many reps as to burn yourself out. Always think of things in terms of percentage. If I squat 200kg, a 20kg increase is only 10%. If you squat 100kg a 10% is only 10kg. If you squat 63kg a 10% increase is only about 6kg.
Loading the Bar
It’s recommended you always condense to the fewest plates possible, as well as the biggest plates possible. For example, you would place a 20kg plate on the bar, rather than a 15+5. There are a few reasons for doing this. First, it saves the use of plates for other people. Now you’re only using 1 plate instead of 2. The other is that the fewer plates on the bar will create less movement during the lift, and thus be safer. The last consideration is that the bigger a plate, the more stress it can handle. We never put a 5 on top of a 10kg plate, as 10kg plates are very thin, and the additional weight of the 5kg plate can cause unneeded stress on the plate when the bar is dropped, and will eventually damage the plate. Always respect the equipment you’re training with. You’ll get more out of it that way.
You want the largest plates on the bar first, and as mentioned earlier as few plates as possible. Always try to use the biggest plates possible. This would mean using a 10kg plate instead of two 5kg plates, or a 15kg plate instead of a 10kg and a 5kg together. A side note about gym lingo: Whenever the weight loaded onto the bar is stated, it refers to ONE side of the bar, and implies that the other side will be loaded identically. For example you may hear a gym bro at a globo gym brag about “benching three plates.” What they would be referring to is three 45lb plates PER SIDE. We wouldn’t say “six plates” because that would imply 6 plates per side for a total of 12. Often when a client asks what they need to put on the bar we might say “a 10, a 2.5 and a 1.5.” and they’ll respond with “each side?” Save for gym stunts or some really specialized training, each side of a barbell must mirror the other in order to be loaded safely. One final note about the language used: Total weight always includes the weight of the bar. In other words, if I tell a client they need 40kg, that does not mean 40kg loaded ONTO the bar, that means 40 total kilos, which would be a 10kg plate on the men’s bar, and a 10kg and 2.5kg plate on the women’s bar.

The proper way to put a plate on the bar
Often you will be loading the barbell as it sits on a rack or pair of squat stands. In this case, loading and unloading a barbell is quite easy. It’s important here that you
load/unload evenly. If you have 3-4 plates on one side, and completely strip the other side, the bar could potentially flip off of the rack. This also happens when the rack is set too close together, which doesn’t provide a wide base. If you’re loading the bar while it’s on the floor (for exercises like rows, deadlifts, snatches, etc…) you want to always be standing OVER the barbell with a foot on either side. This makes it easier to push or pull a plate on or off the bar. If you stand next to the bar, you are now forced to twist as you bend down, which is both uncomfortable and inefficient as you’re not at a good leverage point. If you have many plates on the bar, and you’re adding more, you can roll the bar onto a small change plate to elevate the edge.
Gripping the Barbell
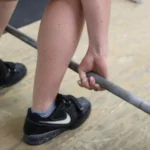
The hookgrip. Very uncomfortable at first, but extremely effective.
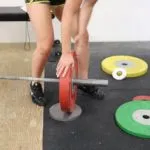
When lifting a barbell there are several different grips you can use depending on the exercise or movement being performed. For pulling exercises (deadlifts, rows, snatches, etc…) you would use a regular pronated grip (hands turned over) or a hook grip. The hookgrip allows a person to hold more weight by wrapping their thumb around the barbell first, and then their fingers around their thumb, thus locking in their grip. This is the preferred method of Weightlifters in the snatch and clean, but is often avoided by casual gym goers as it can be a bit painful for the first few weeks of training. Pulling exercises where you don’t need to flex your elbow (primarily deadlift variations) often use a “mixed grip” (as shown in the title picture of this article) where one hand is pronated and one hand is supinated. This also creates a “lock” on the bar allowing you to grip more weight, however if you constantly train this way, and never switch which hand goes over and which goes under, you can develop overuse injury or muscular imbalance. Typically we have clients train with a double over hand grip, and only switch to a mixed grip on max attempts.

The false grip, thumbs on the same side as the rest of the fingers.
For “pressing” exercises like bench press, over head press, etc…there are two basic options, a regular pronated grip, or a “false grip” also known as a “suicide grip.” In a false grip the thumb stays on the same side of the bar as the rest of the fingers, meaning it doesn’t wrap around the barbell. This allows the athlete to push more from the heel of their palm, which has been confirmed by studies to actually provide more drive and muscle recruitment. The catch? It’s less safe and the bar can roll out of your hands, hence the name “suicide grip.” and for that reason we don’t recommend it. It has also been my experience that this grip develops less forearm strength.
Every barbell has knurling (the rough grippy part of the bar) and “rings” (the small smooth ring in the knurling). You can use these markings and features as landmarks on the bar to help you set up for different exercises. For example, when I snatch I place my hands one inch outside of the rings on either side. This ensures that every time I perform that exercise my hands are placed evenly on the bar, and in the same way every time.
Etiquette and other Training tips
We expect our clients to respect the equipment, including the barbell. Remember the bar only does what you tell it to do, so if you miss a lift, don’t get mad at the equipment. In general you don’t want to step over a barbell (this is considered disrespectful in competition), you don’t want to slam or drop a barbell you don’t have to, it’s common for weightlifters to “throw” the bar off of their back after their last set of squats, but unless you feel like you’re going to pass out or need to get the bar off of your back immediately, it’s best to rack the bar. A barbell should never be dropped without any plates on it! Clips or collars should always be used for safety (exceptions can be made for very experienced athletes during certain exercises). And blood or excessive chalk should be removed from the barbell before the end of your training session. If you’re performing high speed movements like snatches and cleans, it is very important you use a barbell that has sleeves that spin. If the sleeve of the barbell is not designed to spin you can put unnecessary stress on both your shoulders and wrists.
This is the first in a multi-part series about barbell training, so make sure to check back for the next post where we will discuss more advanced training techniques using the barbell!
